
Are you planning on operating an ecommerce website using WordPress? If so, you may want to consider using an SSL certificate to provide a secure connection for your customers. In addition to ecommerce websites, any WordPress site that contains secure data or provides access to registered users should think about the added protection that SSL certificates bring. Setting up an SSL certificate is easy and brings a number of benefits. Keep your WordPress site secure and protect yourself and customers from hackers by securing your website or specific pages.
What is an SSL Certificate?
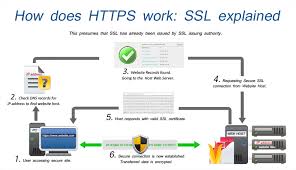
First off, let us discuss SSL certificates and what they are. Whenever you log into a website with secure information, such as your banking website or email account, you may notice that the URL in your browser begins with https instead of http. This lets users know that the webpage is using SSL for a secure encrypted connection. SSL certificates are used to create a secure connection between a user’s web browser and the server hosting the website. SSL stands for Secure Sockets Layer and is the standard used for the establishment of encrypted connections. Without SSL, the information being sent to the web browser is sent over an open connection that could potentially be intercepted by hackers. Basically, if you are sending secure information to customers or users then you should add an SSL certificate.
How Do You Get an SSL Certificate?
SSL certificates are typically handled by your hosting company. The purchase of SSL certificates will vary from hosting company to hosting company. Some hosting companies will provide you with an SSL certificate as part of your web hosting package, while others will charge a yearly fee for each SSL certificate you want to use. Check out your hosting plan and determine the cost of individual SSL certificates, as you only need one per website.
How Do You Add an SSL Certificate?
There are two main options for using an SSL certificate with your WordPress site. You can either force WordPress to use SSL or install an SSL WordPress plugin. Forcing WordPress to use SSL requires the editing of code and should only be performed by those that fully understand PHP and how the structure of WordPress works. For everyone else, there are several free WordPress plugins that make it easy to add an SSL certificate. WordPress HTTPS is the most used free WordPress plugin for SSL and offers all the features you need for adding an SSL certificate; though, before you install any plugin you should make sure that it has been recently updates and is compatible with your current version of WordPress.
Using your SSL WordPress plugin, you can select how you want to use the SSL certificate. You can make your entire website secure, if users are required to login before accessing any webpages, or you can make specific webpages secure. Other options include adding encryption for just the administrator dashboard. You plugin will provide a simple interface for helping you select the parts of your website that are to remain secure.
By taking this simple step to encrypt your website, you can protect users or customers from hackers seeking to exploit the vulnerabilities of your WordPress site. Start by checking if your hosting company includes SSL certificates or requires you to purchase them. Then use a free WordPress plugin to setup your certificate and secure the parts of your website that you want to remain encrypted. Simple and easy, use SSL certificates for better security on your WordPress site.
Are you satisfied with the default comment system used by WordPress? For many WordPress users the answer is no and luckily there are a variety of alternatives to using WordPress comments on your blog or business website. Whether you are looking for a complete replacement for allowing comments on your blog or simply want to disable comments all together, WordPress makes this process fairly simple. Below, you will find options for adding a new comment system and learn how to completely disable WordPress comments.
Disabling WordPress Comments
There are two separate methods you can use to disable WordPress comments. One involves unchecking a few boxes in your dashboard settings while the other requires you to insert a line of code in the comments.php file located in your theme directory. Both methods are simple enough to perform and will soon leave your WordPress site without any comments.
To remove comments through your dashboard settings, first visit the Discussions submenu under the Settings menu. Next to Article Settings you will see a number of checkboxes. Uncheck the options labeled – “Allow people to post comments on new articles”. After saving your changes, your new posts will no longer contain the default WordPress comments; though, your existing posts will still show any comments that were left. To remove these through your dashboard settings you will need to individually go through each post and unselect the Discussion and Comments checkboxes. This can take some time if you have many older posts, which brings us to the quick process of editing a single file to completely disable comments.
For a quicker method of removing comments, navigate to the comments.php file inside your current theme directory. At the top of this file you will see a set of documentation code explaining what the file does. Below this, you will enter the following line of code – . Save your changes and then the entire comment system will be bypassed. Your existing comments will still reside in your WordPress database, but will remain hidden on all future and existing posts.

Adding a New WordPress Comment System
If you still want to allow comments, there are a number of helpful WordPress plugins, and you will not have to go through the above steps to disable the default comment system. These plugins will override the default comment system for you.
The Comments Evolved for WordPress plugin and the Disqus Comment System plugin are a couple of the more popular alternatives to the default comment system. Comments Evolved for WordPress integrates the Google+ comment system with your WordPress site. Users that are signed into their Google account can leave comments, like other comments, and recommend the post through Google+. The Disqus Comment System plugin also completely overrides the default comment system and then replaces it with Disqus. With Disqus, visitors can sign into a Disqus account or sign up with Google+, Facebook, or Twitter. This universal comment system is more streamlined than the default system.
Whether you want to replace the WordPress comment system or completely remove comments all together, there are plenty of options available to you. Use the above steps to get rid of comments on a business site or use a plugin for a more user friendly comment system.
Did you know that WordPress has plugins for creating a maintenance mode? WordPress maintenance mode is intended to be used when you are building a website, or making drastic changes, and want to provide your visitors with something or than error pages. As you build a new site, especially if using an existing domain, you may still receive a steady stream of visitors. Instead of sending these visitors away you can point them to another site or let them know when your new site will go live. Here are some tips and suggestions for those that want to learn how to correctly use a WordPress plugin for maintenance mode.
Understanding Maintenance Mode
While there are a few options for manually creating a maintenance mode, this requires editing or creating files and messing with your WordPress file structure. Without proper knowledge of how WordPress works and how to edit files, it is much safer to choose a plugin for setting up maintenance mode.
Depending on which WordPress plugin you use, maintenance mode usually works by allowing administrators to login and make changes to the site and view pages or posts while unlogged in visitors are presented with a splash page of some sort. In general, you should only use maintenance mode for a complete overhaul of your website, major changes, or when setting up a new website.
Choosing a WordPress Maintenance Mode Plugin
There are several different useful plugins to setup a maintenance mode in WordPress, but the one that receives the most use is WP Maintenance Mode. This is a free plugin that makes switching to maintenance mode simple. After installing this plugin, it is deactivated by default. Once you activate the plugin, your WordPress site will be in maintenance mode and your pages and posts will only be viewable while you are logged in. To turn off maintenance mode, you simply deactivate the plugin.
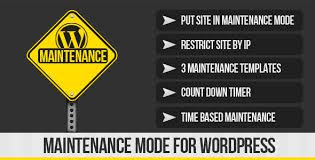
Activating or deactivating WP Maintenance Mode is easy enough, but you also need to decide what your visitors will see when they visit your site. There are many options for a splash page that will be presented to visitors. You can include a contact form, a countdown timer, or even a subscription form. Edit the layout, background, text, and colors of the customizable splash page.
Some of the advantages of using this plugin include excluding specific URLs from the maintenance mode. This allows specific posts or pages to remain viewable for visitors. Other options include setting which user roles are allowed to view your WordPress site while it is in maintenance mode and using it with WordPress Multisite.
Even though there are a few other WordPress maintenance mode plugins, WP Maintenance Mode covers all of the main features that you will need. As a side note, before performing any major changes on your site and switching to maintenance mode you should backup your entire website. With WP Maintenance Mode, you can take your time developing your WordPress site while still providing your visitors with helpful information on a splash page.
Do you have a page on your WordPress site where you answer frequently asked questions? An FAQ page can help provide your visitors or customers with the answers they are looking for. This can cut down on the number of general inquiries you receive and make your visitors happy. While you could simply create a page in WordPress and provide a list of questions and answers, there are a number of WordPress plugins that make it easy to quickly generate an impressive FAQ page that is more user friendly and visually appealing. Use one of these WordPress plugins to create the perfect FAQ page.

Spider WordPress FAQ
The Spider WordPress FAQ plugin is available in both a free version and a premium version. With either version, you can quickly create an impressive FAQ page. This plugin allows you to create a series of questions and answers and then place them into categories. Once you have your content ready, Spider WordPress FAQ uses one of the 22 built-in themes to create your new FAQ page. The premium version adds a few more options, such as adding images, like and unlike buttons, and various customization options. The only downside to this FAQ plugin is that some of the default themes for the FAQ page are fairly basic and unattractive. Those with knowledge of CSS can easily make some changes, but for general users, you may want to find a more user friendly plugin.
WP Awesome FAQ Plugin
The WP Awesome FAQ plugin is a free WordPress plugin. The generation of questions and answers is completed by creating new posts with the FAQ custom post type that is created by the WP Awesome FAQ plugin. This makes this particular plugin more SEO friendly, allowing search engine to index individual questions. You will also get a custom FAQ page that contains a blog roll of all of your FAQ posts. The interface for this FAQ page has a clean look that is very user friendly with expanding answers below the questions.
Arconix FAQ
The Arconix FAQ plugin works in a similar manner to WP Awesome FAQ plugin. It creates the custom post type called FAQ. You can also tag questions to display different sets of questions and answers on different pages. Once you have created your questions and answers, Arconix FAQ provides you with a shortcode that can be placed in individual posts, pages, and widgets. The FAQ uses an accordion box layout to save space.
Q and A Focus Plus FAQ Plugin
Finally, on this list of helpful FAQ plugins is the Q and A Focus Plus FAQ plugin. This plugin brings additional customization and loads of extra features. You can include a comments section on your FAQ page, set categories, and customize the appearance of your FAQ with CSS. It will also generate a widget for displaying recent FAQs. Overall, this FAQ plugin has the most features, but some users may find the abundance of options overwhelming. If you want full control over every aspect of your FAQ page, then is the plugin for you.
FAQs are a great feature to include on any website. Using any of these plugins you can now generate a helpful FAQ page, instead of just typing out a series of questions and answers in a post. If you are going to create an FAQ page for your visitors, then do it the right way – with the help of one of these WordPress plugins.
While this latest WordPress update is not a major release, there are a number of helpful updates that every WordPress user will probably enjoy. The last major release, WordPress 3.9, was completed earlier this year and brought improvements to media management and the WordPress editor. With WordPress 4.0 Benny, the developers have made a few tweaks to make the interface a little more streamlined and user friendly. Check out the new updates and changes that can be found in WordPress 4.0 Benny.
Updated Media Library
The first change to mention is an update to the media library. With the release of WordPress 3.9, the media library gave users the ability to drag and drop images directly into their editor as they create pages and posts. The latest update streamlines the entire media library. Now, users have a grid style view of all of their media including pictures, videos, and audio clips. Browsing through your existing media or editing pictures has never been easier.

Changes to the WordPress Editor
Several changes have been made to the default WordPress editor. First off is the automatic embedding of specific content from social media sites. Whether you want to add a video from YouTube or a tweet from Twitter, users can simply paste the URL into a new line in their editor. Instead of having to view a preview of your post or page to see the final result – embedded content is available to preview live in your editor. They have also added support for more services such as TED talks and videos from CollegeHumor.
In addition to updating the way that WordPress handles embedded content, the WordPress editor has a more user friendly interface. As you scroll down the page, the formatting tools remain visible. The editor will also automatically expand to accommodate the content that you are writing. These minor tweaks go a long way to making the process of writing posts and pages more straight-forward. The newly updated editor is smoother and more functional, especially for those using WordPress on a smaller screen.
Better Access to the WordPress Plugin Directory
Searching the thousands of plugins that are available for WordPress from your dashboard was always a bit of a hassle. WordPress has improved the search capabilities for finding plugins and made the browsing process more visually appealing. This new layout should make it easier for most users to find the plugins that they want quickly.
After just six months, WordPress has released their new update. WordPress 4.0 Benny is named after Benny Goodman – an American jazz musician. The new update helps make WordPress more accessible to the general public by streamlining the WordPress editor, updating the media library, and improving how users can search for plugins. The developers were quick to point out that this was not a major release but instead a minor update to make some changes for a better management experience. Hopefully, everyone will appreciate these updates and continue to support this incredibly popular open-source website creation platform.
In almost every industry, any time a computer is used for any purpose it is recommended that the company creates a regular backup of their files and software. This is even true for home computer users or people that manage a website. So, it should go without saying that creating a backup is something that WordPress users need to consider as well.
During the installation of an update, a new theme or plugin, or while editing core files, your WordPress site has the potential to crash. Another issue can arise if your hosting company has a problem with their servers and losses your WordPress database information. There are a number of ways that you can lose all of your hard work and have to start over from scratch. To prevent losing any part of your WordPress site, choose a quality backup plugin for WordPress and perform scheduled backups.

Free WordPress Backup Plugins
There are not a lot of quality free WordPress plugins for creating a backup of your website. With that being said, WordPress Backup to Dropbox is one of the best free options. This plugin works by connecting to your Dropbox account. After providing the plugin access to your Dropbox account, you can set how often you wish to perform a backup and whether you want to exclude any files or directories. This is a simple free plugin that can be used to create an entire backup of your WordPress site without a lot of confusing options – making it perfect for most bloggers and everyday users.
In addition to WordPress Backup to Dropbox there are a few other notable free plugins to consider. BackWPUp works similar to the previously mentioned plugin while allowing users to choose other third-party online storage sites besides Dropbox. If you would rather not rely on third-party cloud storage then take a look at BackUpWordPress, which uploads the backup to your WordPress server.
Premium WordPress Backup Plugins
For large businesses, groups working with WordPress Multisite, and other high-traffic WordPress site, you may be safer choosing a premium WordPress backup plugin. Even though these plugins require a fee, they offer a more reliable backup plan for larger sites.
VaultPress is a premium backup plugin that requires a monthly fee. It provides automated backups, a simple user interface, and scheduled backups. With VaultPress, you can even perform several backups throughout the day, which is important for sites that are constantly being updated. The other advantages of VaultPress include security scans and complete customer support.
BackupBuddy is another premium WordPress plugin that makes scheduling backups quick and easy. The different plans available are comparable in price to VaultPress; though, BackupBuddy has the added benefit of allowing users to select a third-party storage service, including Dropbox and Amazon or through an FTP server. Like VaultPress, BackupBuddy provides security scans for added protection.
There are free and premium options when it comes to backing up your WordPress site. When choosing which is right for you, consider how often you post new content and how large your site is. For smaller personal sites or blogs, the free plugins should suffice. When dealing with a much larger site or a WordPress site that gets updated several times a day, choose one of the premium WordPress plugins. Backing up your site is easy, once you choose the right plugin for your needs.
Do you struggle to convert your internet traffic into sales leads or additional subscriptions? If you answered yes then you may not be effectively using a call to action on your website. Many internet users scroll through content and they may never notice your subtle hints telling them to sign up for a newsletter or to contact you for more details. Having a clear and concise call to action is crucial to having higher conversion rates. Luckily, like most things when it comes to WordPress, there is a plugin that can help. Here are a few suggestions for adding a successful call to action on your website using WordPress plugins.
Consider the Placement of Your Call to Action
Where you decide to place your call to action will definitely have an impact on how effective it is at grabbing the attention of your visitors. In general, you should always include some type of call to action at the end of any post or page that explains services or products that you are promoting. Typically, this call to action should include a link or button for more information or to redirect the visitor to a specific webpage. People do not like having to scroll through a site to discover what your call to action is referring to. While you could simply type your own call to action at the end of posts and pages and then include a link, there are several WordPress plugins that make this process easier.

WP Button Creator Plugin
Buttons always stand out and provide a great way to include a call to action on any page or post. The WP Button Creator Plugin is a simple free WordPress plugin that does exactly what it says in the title – it creates buttons. You can customize the size, color, and style of the buttons and create as many buttons as you would like. When creating a button, you can include a URL to a specific landing page or product or even link the button to a telephone number or email.
WordPress Calls to Action Plugin
If you want more options than the WP Button Creator Plugin provides then consider the WordPress Calls to Action Plugin. This plugin also allows you to create simple buttons, but includes many more options. You can make impressive stylish buttons to be placed anywhere on your site and even make pop-up displays to promote newsletters or special offers. Best of all, this plugin monitors and tracks conversion rates. Keep track of how often users respond to your calls to action and improve your conversion rates.
Magic Action Box Plugin
The previous plugin combines the ability to create pop-up window boxes and individual buttons. If all you need are window boxes then use Magic Action Box. With Magic Action Box, you can make your own window box pop-ups in just minutes. Include a call to action, images, and a simple form for collecting email addresses for a newsletter or subscriptions.
Having a call to action is essential when you want your visitors to perform as specific action. You need this call to action to stand out and grab their attention. The best way to achieve this is with the help of one of the three WordPress plugins mentioned above. Decide on what types of calls to action you plan on including and then choose the appropriate WordPress plugin.
Start increasing your conversion rates today with the help of a useful WordPress plugin.
How quickly your WordPress site loads on when a visitor arrives at your site directly affects how likely they are to stay on your website. This is especially true when it comes to mobile devices – which may not be able to pull up a site as quickly as a desktop browser. Whether you use WordPress for a business website, a blog, or as your portfolio, speed definitely matters. To determine if your site is fast enough and to improve the loading time of your site follow these steps for a faster WordPress site.
Determine How Fast Your WordPress Site Loads
The first step in speeding up your WordPress site is determining how quickly it currently loads. There are several websites available that allow you to enter a URL and test the speed of the webpage. Look for Pingdom Tools or other online speed tests, which will let you know how long it takes for your site to load. Your goal should be a load time of 3 seconds or less.
Google has their own site that provides suggestions to speed up your site, which can quickly be found by searching for Google Page Speed Insights. Type the URL of your homepage and follow the suggestions provided.
Find a Light WordPress Theme with Responsive Design
When it comes to optimizing your WordPress site, everything starts with the theme and then trickles down from there. Your WordPress site should use a theme that is light and uses a responsive design. The responsive design allows you to avoid planning for mobile devices. You will have one site that looks great across all devices. It also helps to look at premium WordPress themes. Premium themes with great reviews by other users are more likely to have smoother coding and a lighter design for faster loading.

Cut Down on WordPress Plugins
It can be fun to find WordPress plugins that provide a variety of interesting features, but this can also slow down your site. Whenever possible, avoid installing new plugins unless they are necessary for a specific feature that you absolutely need. If there is a way to accomplish your goal without the plugin then skip it. Try to keep the amount of plugins you install to less than ten.
Use Caching Plugins
Caching plugins are becoming more popular with WordPress users for the vast improvement in speed that they can bring. Instead of visitors needing to wait while WordPress generates the page or post they want to see by accessing the database and running various scripts and plugins, a caching plugin will create a static version of every post and page on your site. These static pages are served to visitors instead of the standard dynamic loading used by WordPress. This can have dramatic effect on your page speed.
The bottom line is that you need to keep it simple. Choose a good theme, limit the use of plugins, and find a caching plugin. If you follow these suggestions, you can help keep the load time of your WordPress site to a minimum and keep your visitors happy. Start speeding up your WordPress site and enjoy the positive results.
WordPress has moved beyond being a simple blogging platform and larger businesses and organizations are starting to see the advantages. Choosing WordPress as a content management system or for the development of a large website is a more affordable option for businesses and organizations. If you are setting up a WordPress site for a business or organization then learn how to use the features of WordPress correctly to make the entire process easier.
Know the Organization or Business
Your first step is to fully understand the overall structure of the business or organization that needs a WordPress site. How large are they and how many employees will be accessing the WordPress site? Do they have multiple departments? Also find out exactly what uses they want to get out of the WordPress site. Determine if they simply need a large website for showcasing their organization or business, whether they will be selling products or services, and if employees will need access to the website for individual tasks.
Using WordPress Multisite
Depending on the situation, it may be easier to use WordPress Multisite. This option allows you to manage a group of individual WordPress sites that all have access to the same plugins, themes, and features. For example, if the business or organization that are having a WordPress site built need one site for the general public and another for their local intranet, WordPress Multisite can cut down on the amount of time needed to manage updates and changes.
Installing the Appropriate WordPress Plugins
A large company or organization is likely to have special needs. There is a good chance that a standard WordPress site without any plugins will not have all the features they need. You may need to install ecommerce plugins or a plugin for setting up a local intranet or forum. Find out exactly what features the company or organization needs and then install the plugins you require.
Managing Users
If there are going to be a lot of employees that need access to the site, it may help to install a WordPress plugin that improve user management. WordPress does a pretty good job of assigning user roles; though, this may not be enough when there are many employees with various responsibilities. Using a WordPress plugin, such as the User Role Editor Plugin, you can create new user roles, rename user roles, and assign or remove permissions. By editing the user roles, you can create roles that fit the exact requirements of each level of employee.

Test the Website and Keep Everything Updated
Before the site goes live or you allow employees to start accessing features on the website, you should thoroughly test the site to make sure everything works. Visit every page and access every feature. Once you know for sure that everything is working exactly as it should, remember to keep everything updated and back up the entire site on a regular schedule.
Creating a WordPress site that is going to be used by a business or organization with a lot of needs and many employees can be more complicated than creating a basic WordPress site. To make the process easier, understand the company you are creating the site for, find out what features they need, and determine if individual user roles are needed. Finally, always take your time and never skip any steps. If you stick to these simple rules, you should have no problem creating and managing a large WordPress installation.
When you hear the name WordPress do you immediately think of blogs? While blogging may have given WordPress its rise to fame it has grown over the years and is now capable so much more than acting as a great blogging platform. Using the same tools as WordPress bloggers, you can create forums, professional business sites, portfolios, and ecommerce sites. By choosing the right WordPress plugins you can create just about any type of website. Keep reading to discover the many ways that you can use WordPress besides blogging.

Create a Professional Business Website
If you spend a few minutes browsing through WordPress themes you will quickly see that many theme developers are already focused on the creation of themes specifically for business use. These clean and professional designs often look great and provide the perfect method of showcasing your business. When it comes to creating a professional looking business website with WordPress, always start with the right theme. If you are not planning on selling products or services directly from your site, then you probably will not need to mess around with plugins and additional features.
Build and Manage a Forum
In the past, many people would overlook WordPress if they wanted to create a forum. Thanks to several well-designed WordPress plugins, it has never been simpler to design your own forum. WP Mingle is a popular WordPress plugin that allows you to add a forum to your existing WordPress site. With WP Mingle includes the management process of registering members, adding a login, and a standard forum structure that can act as a stand-alone page on your WordPress site and be added to your WordPress menu.
If your entire site is going to be one large forum, then look at bbPress. This open source software that is a variation of WordPress intended solely for using to create forums. It works exactly like WordPress and even allows you to add plugins created for WordPress.
Making an Ecommerce WordPress Site
When you want to sell products and services through your WordPress site there are many options to choose from. Before you get too far with the creation of your WordPress ecommerce site you should start looking at ecommerce WordPress themes. Woocommerce makes several themes that already have ecommerce capabilities included. If you cannot find an ecommerce theme that you like, there are lots of ecommerce plugins to choose from. Whether you decide to use an ecommerce theme or plugin, always look at the features provided. Find out what payment methods are accepted, how inventory management is handled, how easily you can add products to your website, and whether you need to pay to unlock more features. As with many themes and plugins, some are free and some cost money. If you are serious about starting and ecommerce website using WordPress, it may be worth the price to get a premium theme or plugin that includes credit card payment gateways and advanced shipping and inventory options.
There you have it – WordPress can be used for just about anything. From forums to ecommerce sites, WordPress can do it all. After more than a decade of use, WordPress is no longer just a blogging platform. If you want to create any type of website, WordPress has plugins and themes to help you.